
March Project Recap: Desk Revamp
I may have inadvertently found a new hobby. As you guys know, I’ve been in the market for a new writing desk. For a full recap of my needs that led to this project, check out my pre-project post here. You guys saw the before pictures on that last post but here’s another look to refresh your memories before getting a look at the new (and improved) writing desk.

Uhh, guys, I think I really like carpentry. I know I didn’t actually make something out of a hunk of wood, but I did spend several hours reworking that wood desk, and there was something oddly calming about it. If you lived at my apartment complex you would have seen me out on my patio, sweatshirt and sweatpants littered with sawdust. Or maybe you saw me laying on the cement ground priming it from head to toe. I loved losing myself in the process with my ear buds in and witnessing it transform into my vision.
I had a very specific look conjured up in my mind for this antique desk. Honestly, it had a timeless feel to it in its natural state. Like I mentioned in my last post, it had character built in, but I decided to amplify the old world charm it already possessed with paint. This writing surface would be my creative hot spot, so I needed to think about what helps me get into those creative moods and enact that feeling into its new look. I had a couple different color schemes rolling around in my mind’s eye, but one in particular bled through and left a beautiful stain. Green.
I’m talking about a dark, rich green that took me back to the ornate home of an Earl during the late 1800s. I imagined a room full of classic pieces, old and unique furniture, only available to few because it was a one of a kind find. I imagined the history in a piece like that and needed that same element in my new desk. To me, the desk tells a story all its own just by looking at it, so it’s only appropriate I write stories on its surface. A side note here: it doesn’t match anything, absolutely nothing, in my home, but I don’t really care.

So here’s my revamp process. First I needed to sand it down, like a lot. It had its fair share, or more, of knicks and dents that just would not do in a classic piece. Dad gave me his dad’s DeWalt sander, thanks dad! and I began the few day process of making it super smooth.


Next it was primer time. I used Premium Wall and Wood Primer from Sherwin Williams everywhere except the writing surface itself.


Next I painted two coats- I actually did three coats on the legs- in green. I did the exact same sanding and painting routine on the drawer as well. I used, again from Sherwin Williams, SnapDry paint.

One of the scariest parts of this project was staining the writing surface. Again, I had a color picked out in my mind and made an educated guess when I picked out the actual can. I’ve heard that some stains look different on different woods, and of course I didn’t know the kind of wood I was working with, so I found a stain that looked pretty on the can and prayed it would work in real life. I was pleasantly surprised with how it turned out.
After that I applied a polyurethane varnish, and if I’m being totally honest, I wasn’t thrilled with how it looked. It warped the color a bit, made it appear more red than brown (I may have cried). I was in love with the stain, but not so much with the varnish. I hated to do it, but I had to: I re-sanded and stained. It’s not 100% back to its original look, but I like it better than before.
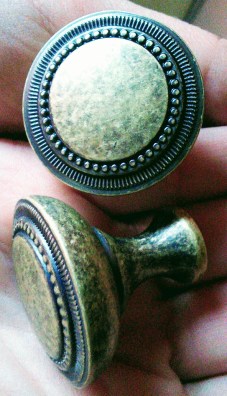
For the knobs, I found this elegant little pair at Home Depot. To me, they feel very vintage and historic (the overall look I was going for). I looked exclusively for knobs with gold or brass finishes. I was pleased with the result. What do you think?
Here it is! I must say, it looks more blue in these pictures, but trust me, it’s dark green! Here’s the original stain before I redid it.
 Below are pictures of the updated stain.


I’ve loved working on this desk, and I’ve learned way more than I anticipated before tackling this project. I had a pretty disheartening setback with the stain color which added more time when I thought I had finished. But I learned a lesson: things happen. Not everything turns out exactly the way you imagine it and that’s okay. Patience truly is a virtue. It’s just a reminder to stay calm, don’t allow yourself to overreact or get angry over little mistakes and enjoy the process.
Special thanks to my family for their help, advice, and support.
Cheers!


One Comment
Jeff Finkbeiner
love it!